Tuesday, August 25, 2015

Late Summer Bees

Summer is winding down and the bloom is definitely off the rose.  There is just not much blooming right now so I decided to go out and check on the bees and see how they're set for food.

The strong hive seemed to have a decent amount of honey, but the the split and the nuc didn't seem to have a whole lot.

From 2015-08-10

These are the frames I bought from a local guy who traps bees for a hobby.  They looked pretty good in his yard, so I'm hoping they'll take when I combine them with one of my weak hives that appeared to be queenless.

From 2015-08-10

I also decided it would be good to start feeding the weaker hives so they can stock up some stores for winter.  I've been experimenting with top feeders (shown below) which dedicate the food for the weak hives but require more visits and manual work.

From 2015-08-10

As opposed to a community feeder which can be left for longer periods of time but has no protection for weaker hives.

From 2015-08-10

At this point, I'll probably continue to do a mixture of both.

Wednesday, August 19, 2015

Forest Creatures XIV

Latest Forest Creatures video.  Got some great footage of a deer in velvet, a hawk, and flock of turkeys drinking at a vernal pond in the forest.


Monday, August 10, 2015

How To Inoculate a Mushroom Log

We had some extra time Saturday so Sarah and I decided to make good use of an oak tree I had to cut down for a fence we're building.

We had a few packets of  Warm Blue Oyster mushrooms from Mushroom Mountain sitting in the fridge that needed to be used and this was the perfect opportunity.


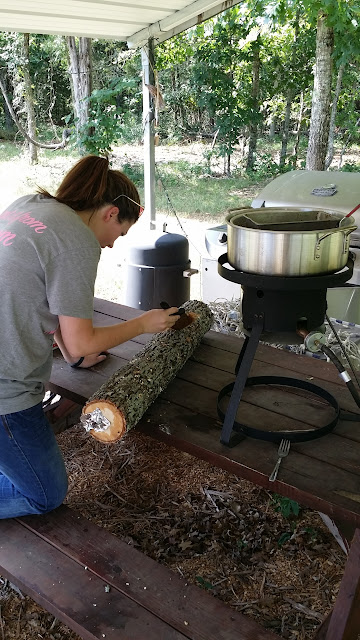
After cutting the tree, the first step was to section up the trunk into approximately 2 foot lengths.  Once that was done then next step is to start drilling holes in the log to tap the mycelium covered plugs into.

As you can see, the plugs in the packet are covered with white mycelium, so they should work great.

From 2015-07-15

We started off the drilling by measuring 2" in from the end and drilling a hole the same size as the plug.  Then we drilled another hole every 6" in a straight line down the log.

From 2015-07-15

After the holes were drilled, we followed up by going down the line and gently tapping the plugs in.

From 2015-07-15

After that was done we  rolled the log about an 1/8 of a turn to start the next row about 3" across the circumference and 6" down from the end.

By doing this, we created a star pattern that gives maximum coverage for the mycelium to take over the log.

From 2015-07-15

While we were drilling, we got our double boiler going to melt the paraffin wax we'd be using to seal all the plugs we'd recently tapped in.

From 2015-07-15

The purpose of the wax is to seal the hole so insects or competing mycelium don't get in and take over the log before our warm blue oysters do.

From 2015-07-15


The tree we cut wasn't huge, so we made the logs a little longer than usual.  A rule of thumb is that you get a season of mushroom fruiting for every inch of diameter.  It would seem good to get the largest diameter possible.

However, the larger diameter increases the amount of time it takes for the mycelium to fully take over the log. With this skinnier log, we're expecting 6-9 months before we get any fruiting.  With a bigger one it would be proportionally longer, not to mention being harder to lift and handle.

Also, notice the aluminum foil at the end of the log.  We wrote down the date and what kind of mushroom on it and stapled it to the end because, after 6 months, I'll have no idea what we used.

From 2015-07-15

As you can see, the plugs are hard to spot once they're tapped in.  We found it effective to wax them immediately after tapping them so we wouldn't miss any.

From 2015-07-15

Plugs waiting to be tapped.

From 2015-07-15

After a couple hours of work, we got them all done.  We were able to get about 100 plugs put into about 20 feet of oak.  Not a bad days work.  Looking forward to sampling the fruits of our labor. (no pun intended)
From 2015-07-15

Wednesday, August 5, 2015

Fence Posts Are In! New Gravel

It's been so stinkin' hot lately that work at the prop has slowed to a crawl.  One project I've been putting off, due to the heat, was burning some of my brush piles.

I had a pile of bulldozed cedars by the camping area that has been bugging me all summer.  Last Saturday, despite the 90 degree weather, I decided to burn it.  That was probably a mistake since I just about gave myself a heat stroke, but it was worth it get the pile burned down a bit.

Here's a before shot.  I was so tired after that I forgot to take an after shot.

From 2015-07-15

Even though it was so hot, I made a push to get all the fence posts in.  I kept hoping the fence line would get less rocky as we approached the end.

From 2015-07-15

No such luck.  It was basically solid limestone the rest of the way.  The white power to left of the jack hammer is the rock I pulverized in the post hole.

From 2015-07-15

Eureka, the end!   I finally made it to the end of the fence line. Now I just need to put up the slats and put some sealer on it and it will be done.

Once I've recovered financially and physically, I'll start on the other side of the gate in the upper right corner of the picture below.

From 2015-07-15


Here's another view of all the posts I put in.  By the end I was averaging about 4 posts a night.  Not too bad for one old guy, a manual post hole digger, and solid rock.

From 2015-07-15

My other project is preparing for getting a barn built.  Step one was leveling the area.  Step two is putting some gravel in while a big truck can still get back there.

From 2015-07-15

Here's the truck trying to make the corner.  It's always such a happy day to see the gravel get put down.  It makes everything look so much more civilized.

From 2015-07-15

Now to push it out a little thinner with the bulldozer.

From 2015-07-15